Setup guide
Vixie setup guide: from sign-up to your first photo magnet sale.
No tech skills required. This setup guide walks new Vixie vendors from creating an account to selling photo magnets at their first market — usually in about 30 minutes. If you can take a photo on your phone, you can run a Vixie booth.
Last updated April 2026 · Questions? Email support@vixie.app
Before you start
What you'll need
- A laptop or tablet for setup — about 30 minutes of focus, but you don't have to do it all at once
- A way to get paid online — a Stripe, PayPal, or Square account (all free to create)
- A photo or logo for your brand (optional, you can add it later)
Selling in person? You don't need a card reader. Vixie generates a QR code customers scan with their own phone — they pay you, you print.
The 6 steps
From empty dashboard to live booth.
- 1
Step 1 — Create your account
2 minutesSign up with your email at app.vixie.app and pick a password you'll remember. Vixie creates your storefront URL automatically — something like yourname.vixie.app. You can rename it in the next step.
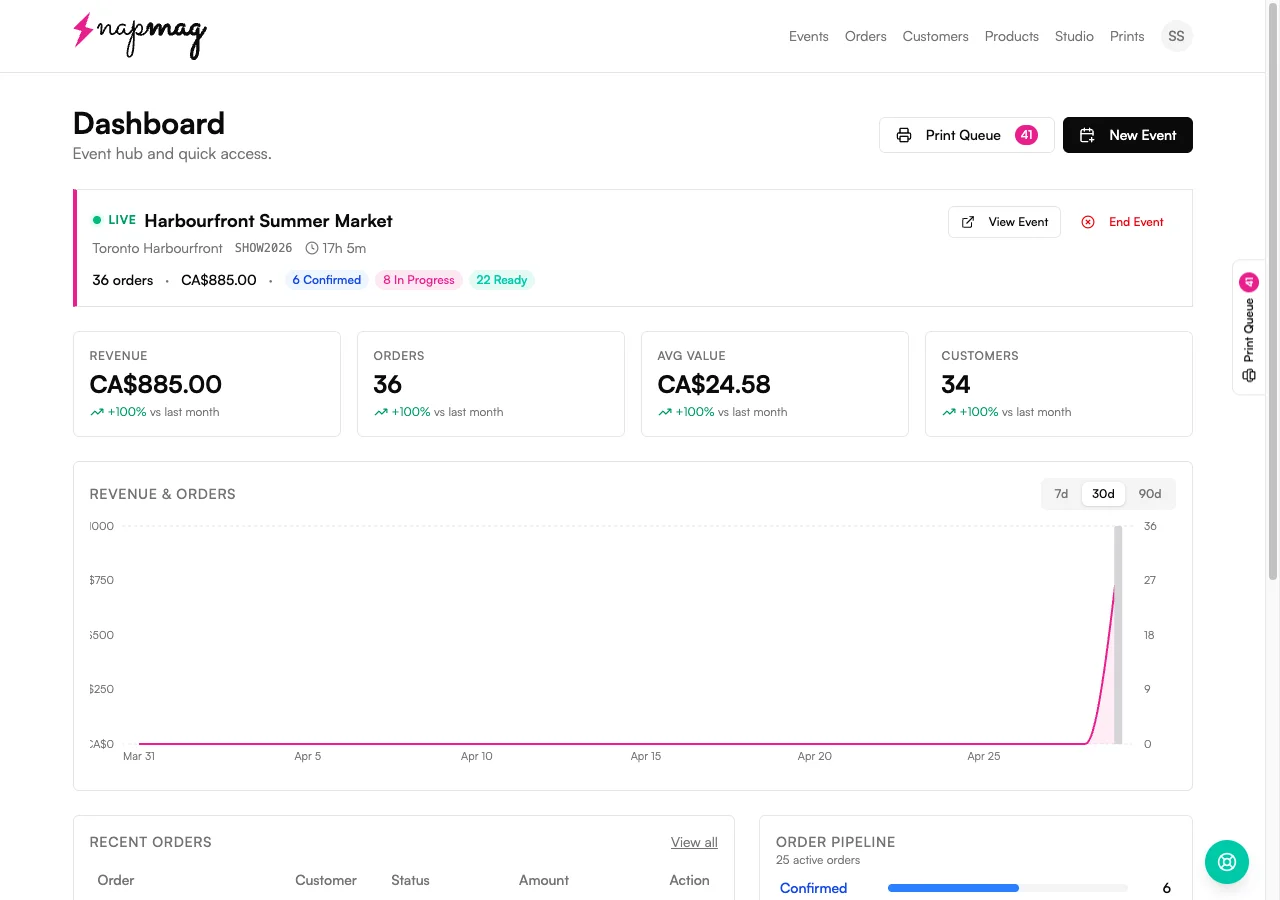
You'll land on your dashboard with a setup checklist on the right.
- 2
Step 2 — Make it yours
5 minutesOpen Your Account in the setup checklist. Set your business name and currency, and tweak your storefront URL if you want something shorter (6–40 characters, lowercase). Upload a logo if you have one — if not, skip it and add it any time.
Your store URL now shows your business name at the top of the dashboard.
- 3
Step 3 — Connect a way to get paid
5 minutesOpen Payment Connection in the checklist. Pick Stripe (recommended), PayPal, or Square and click Connect. They'll send you to their site to log in or sign up. Don't have a Stripe account yet? Creating one is free and takes about 5 minutes — have your bank details and a photo of your ID handy.
A green "Connected" badge appears, and the "can't accept online payments" warning disappears from your dashboard.
- 4
Step 4 — Set up your first product
5 minutesOpen Products in the checklist. We've already created a default photo magnet to get you started — click it to edit, or hit New product to add another. Choose a magnet type (Custom Photo, Photo Puzzle, or Tic-Tac-Toe), pick the sizes you'll print, and set your pack prices. For example: 1 magnet for $8.99, or an 8-pack for $49.99. Save and toggle the product to Active.
The product appears under "Active products" on your dashboard.
- 5
Step 5 — Add your branding
3 minutes — optionalOpen Branding. Add the small text that prints along the seams of every magnet — usually your business name on the bottom and a hashtag or website on top. This shows up on every magnet you sell, so customers remember where they got it.
The preview on the right updates as you type.
- 6
Step 6 — Launch your first event
5 minutesFrom the dashboard, click New event. Name it (e.g. "Saturday Farmers Market — May 4"), pick which products you're selling, and choose how customers pay: at the booth only, self-pay online, or both. Hit Start event. Vixie generates a QR code and a short URL like vixie.app/e/X5K7Z9 — print the QR, tape it to your booth, or display it on a tablet. Customers scan, upload their photos, pay, and you print.
Orders appear live on your dashboard as customers check out.
Printing your magnets
Get your prints lining up perfectly.
This is the step most new vendors get stuck on. Different machines cut at slightly different measurements — a "2.5-inch" machine might cut at 2.503" or 2.612". So the first few sheets usually need a small nudge in Edit Measurements to match what your machine actually cuts at. Once you dial it in, Vixie saves the settings — you won't touch them again. Want the deep dive on every field? Read the full size measurements guide.
Dial it in in 5 small steps
Print one test sheet, compare it to your press or cutter, then nudge the four values until everything lines up. Most vendors get there in 2–3 test sheets.
- 1
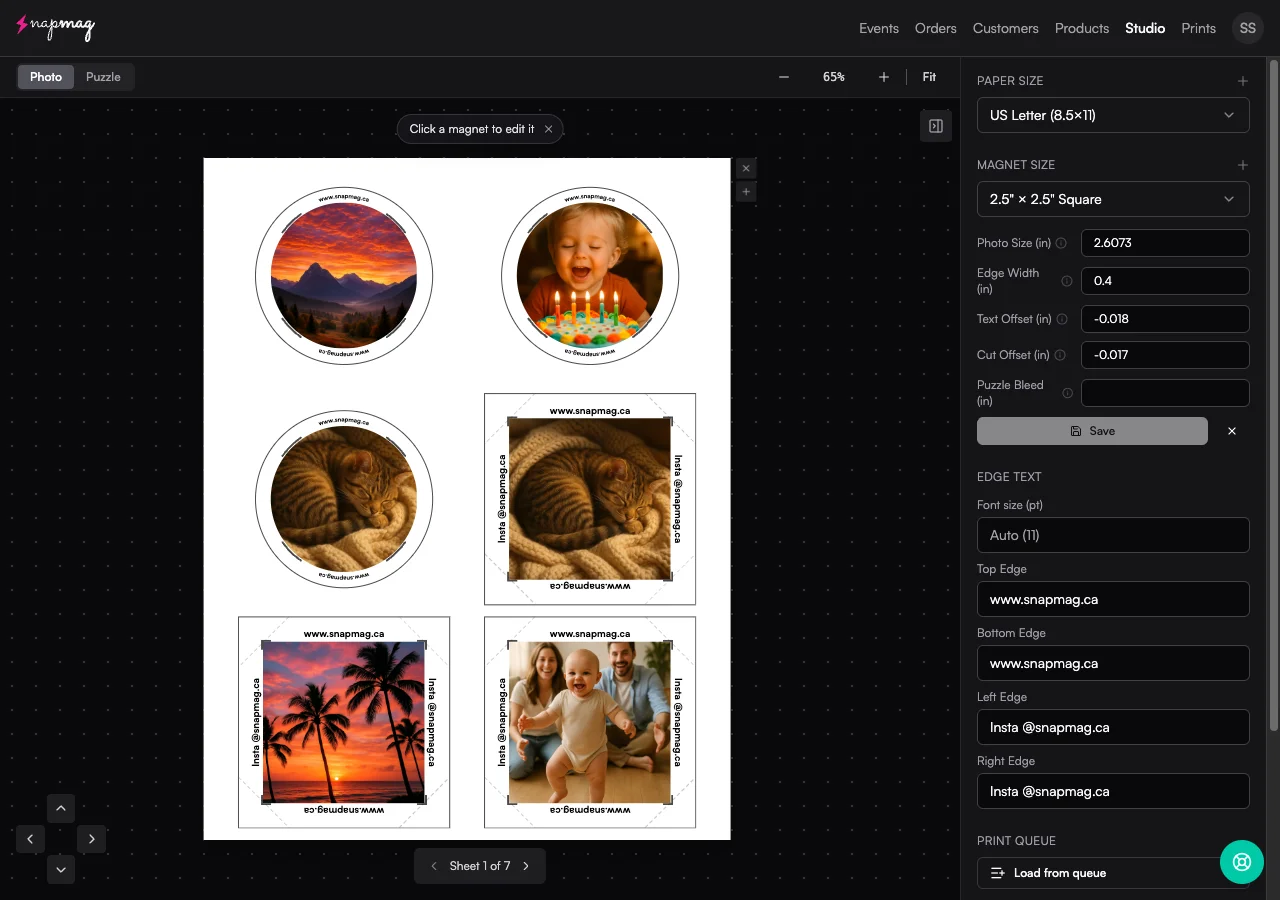
Open Print Studio and pick your magnet size
Open Print Studio and select the size you're dialling in (e.g. 2.5" × 2.5"). Dial in one size at a time — settings save per size. - 2
Click "Edit Measurements" and print one test sheet
Don't change anything yet. Print a single sheet at actual size with a few photos loaded so you have something to measure against. - 3
Hold the sheet up to your press or cutter
Now you can see what's off. Match what you see to the right value:- Photo too big or too small? Adjust Photo Size. Move in 0.05" steps — increase to enlarge, decrease to shrink.
- Border around the photo too thick or too thin? Adjust Edge Width. Same 0.05" steps.
- Seam text not sitting where it should? Adjust Text Offset. Negative values nudge inward, positive values nudge outward.
- Photo wrap doesn't fold cleanly around the magnet edges? Adjust Cut Offset. This is the one most vendors actually tweak. It controls the diagonal corner cuts that let the photo wrap flush around the edges, instead of bunching or leaving a gap.
- Puzzle pieces don't sit flush when assembled? Adjust Puzzle Bleed on a puzzle product. + tightens the gap between magnets, − opens it up. Save when the seams look right.
- 4
Save, print another sheet, repeat
Most vendors are dialed in after two or three sheets. Make small changes — large jumps overshoot and you'll be chasing the values back. - 5
You're done
Vixie remembers these values for every future print at this size, on every event, on every order. Repeat the process for any other magnet sizes you sell.
Tip: Dial in each magnet size separately. A 2"×2" that prints perfectly doesn't guarantee your 2.5"×3.5" will.
Full size measurements guide — every field, every symptom, every fixAfter your first sale
Once orders start coming in.
When a customer pays, two things happen automatically: the order shows up on your dashboard with their photos, and the magnets land in your Print Queue ready to be printed in a batch.
Track every order
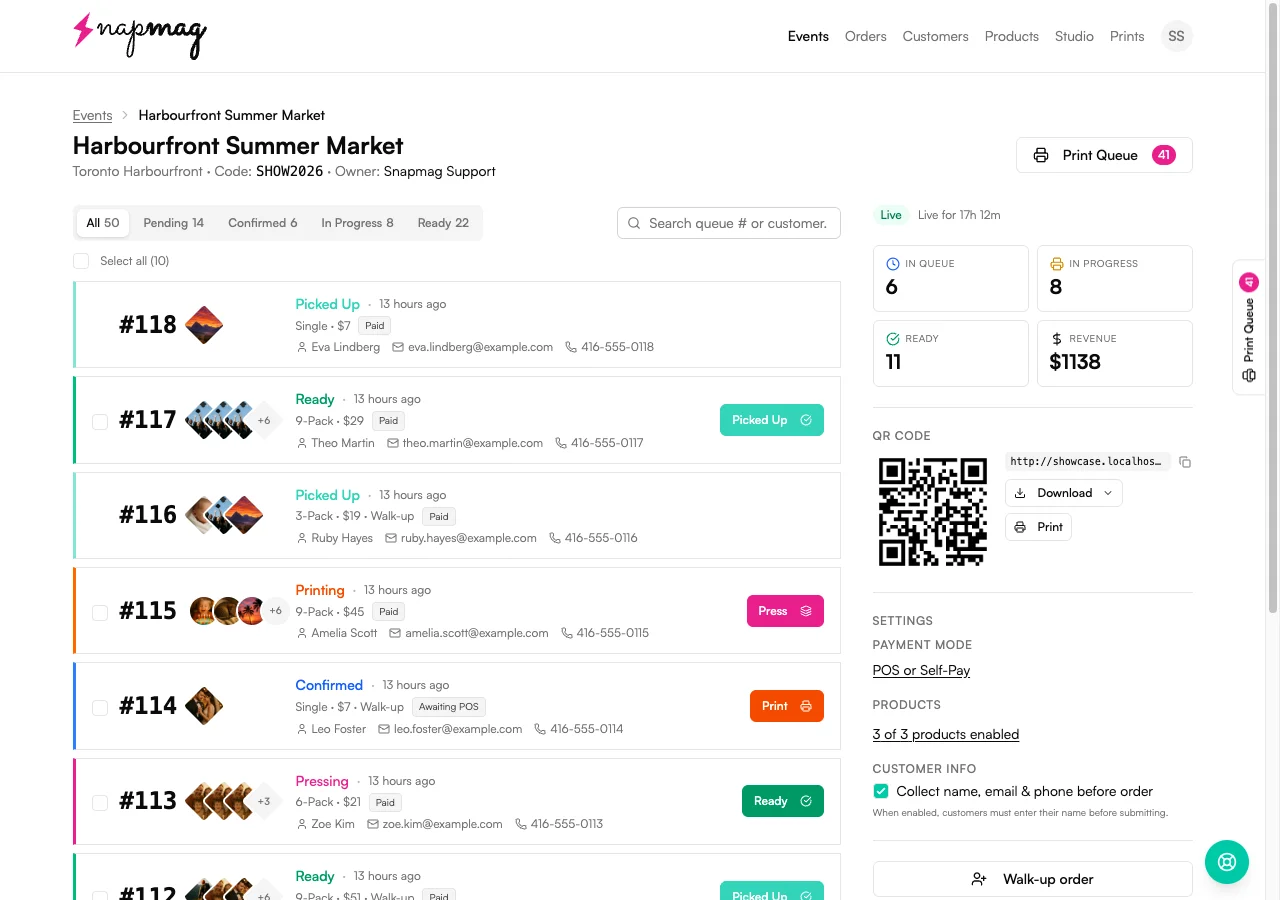
Each order moves through Pending → Confirmed → Printing → Pressing → Ready → Picked Up. Tap the status to update it.
See the customer's photos
Open any order to see what they uploaded and how they laid it out — no guesswork on which photo goes where.
End the event
Sales close, the QR stops accepting new orders, and you get a summary of total revenue for the day.
Printing the orders that come in (the Print Queue)
The Print Queue is its own page in Vixie. You don't print orders one at a time — open the queue, hit Print, and Vixie generates a print-ready sheet from every paid order waiting.
- 1
Customers pay → orders land in your Print Queue
Every paid magnet shows up in the queue automatically — no exporting, no re-uploading. The badge in your top navigation shows the count of magnets waiting to print.
- 2
Open the Print Queue
Filter to a specific event or leave it global to print across events. Reorder, remove, or push an order to the top if a customer is waiting at the booth.
- 3
Hit Print
Vixie generates a print-ready sheet from the queued orders — photos cropped, sized, and packed onto your paper. Send it straight to your printer. The magnets flip from "queued" to "printed" and the orders advance to Pressing automatically.
- 4
Open in Print Studio if you want to edit first (optional)
For most batches you don't need Studio at all — the queue's Print button is the fastest path. Open Studio only when you want to tweak a crop, swap a photo, or adjust the layout before printing.
If a sheet jams or prints wrong: open the Prints page, find the batch, and re-print it. Vixie re-renders the same magnets onto a fresh sheet — you don't have to chase the orders back through the queue.
Tips from the field
Small habits that save Saturday mornings.
Test the flow on your own phone first
Scan your QR, place a $1 test order, refund it. You'll catch any setup gaps before customers do.
Print two QR codes
One taped to the booth, one on a small standing sign. People miss the first one.
Charge for the pack, not the magnet
"8 magnets for $40" sells better than "$5 each." Same price, very different conversion.
Have a backup hotspot
Markets have flaky Wi-Fi. A phone hotspot keeps you taking orders when the venue's connection drops.
Questions
Getting Started FAQ
Do I need a card reader?+
What printer do I need?+
My prints come out the wrong size — what's wrong?+
When does an order show up in the Print Queue?+
Can I print orders from multiple events on the same sheet?+
Can I sell at multiple markets?+
What if I mess up the setup?+
How do I get paid?+
Can my staff use this without their own account?+
Where can I get help?+
Keep going
Related reads.
Magnet size measurements
Annotated walkthrough of every Edit Measurements field, plus a diagnostic table for the test sheet.
Read more →Event-day · 7 stepsRunning a Vixie event
From Start event to last pickup — the order pipeline, batch printing, and walk-ups.
Read more →Free toolFree Print Studio
Drag-and-drop sheet layout for mixed-size and puzzle magnets — free in your browser.
Read more →Ready to set up your booth?
About 30 minutes start to finish. You don't need to finish in one sitting — your progress is saved.
Create my accountOr see pricing →