Event-day playbook
Running a Vixie event: from doors-open to last pickup.
The event-day guide for vendors with an event already set up and ready to go. Every step matches the screen you'll see in the app — exact buttons, exact statuses, exact what-to-tap-when. New to Vixie? Start with the setup guide first.
Last updated April 2026 · Questions? Email support@vixie.app
Before doors open
Five-minute pre-flight
- Test-scan your QR with your own phone — drop a $1 test order, refund it from your payment provider after.
- Confirm your payment connection still shows the green Connected badge on the dashboard.
- Print two QR codes — one taped flat on the booth, one on a small standing sign. People miss the first.
- Have a phone hotspot ready. Venue Wi-Fi flakes out at the worst moments.
- Lock in your payment mode — POS Only, POS or Self-Pay, or Prepaid — in event settings before doors open.
Haven't set up an event yet? The full setup walkthrough — account, payments, products, branding, and creating your first event — lives in the setup guide. About 30 minutes start to finish.
Payment mode
Pick how customers pay before doors open.
Your event has one of three payment modes, set in event settings. The mode controls three things: whether the QR offers Stripe checkout, whether orders sit Pending Payment until you mark them paid, and whether the customer pays at all. You can switch modes mid-event — Vixie will ask you to confirm — but locking it in beforehand saves headaches.
POS or Self-Pay
DefaultCustomers either pay online through the QR — Stripe handles Apple Pay, Google Pay, and card — or hand you the order to mark paid at the booth. Most public markets, fairs, and pop-ups run on this mode.
In the queue: Self-pay orders auto-advance to Confirmed once Stripe clears. Booth-paid orders sit as Pending Payment until you tap Mark paid.
POS Only
Booth-onlyDisables online payment entirely. You collect every QR order at the booth. Useful when your provider isn't connected yet, you're running a cash-only event, or you want every customer to come back to the table.
In the queue: Every order lands as Pending Payment with an "Awaiting POS" badge. You confirm payment manually before it joins the print queue.
Prepaid
Private eventsNo payment collected. Every order auto-confirms the moment the customer submits photos. For weddings, corporate events, and private parties where the host has already paid you up front.
In the queue: Orders skip Pending Payment entirely and land as Confirmed. The customer never sees a price or a payment screen.
Walk-up orders behave the same across all three modes — staff create the order, mark it paid in cash, and it lands as Confirmed regardless of payment mode.
The 7 steps
From Start event to Picked Up.
- 1
Step 1 — Start the event and put the QR in front of customers
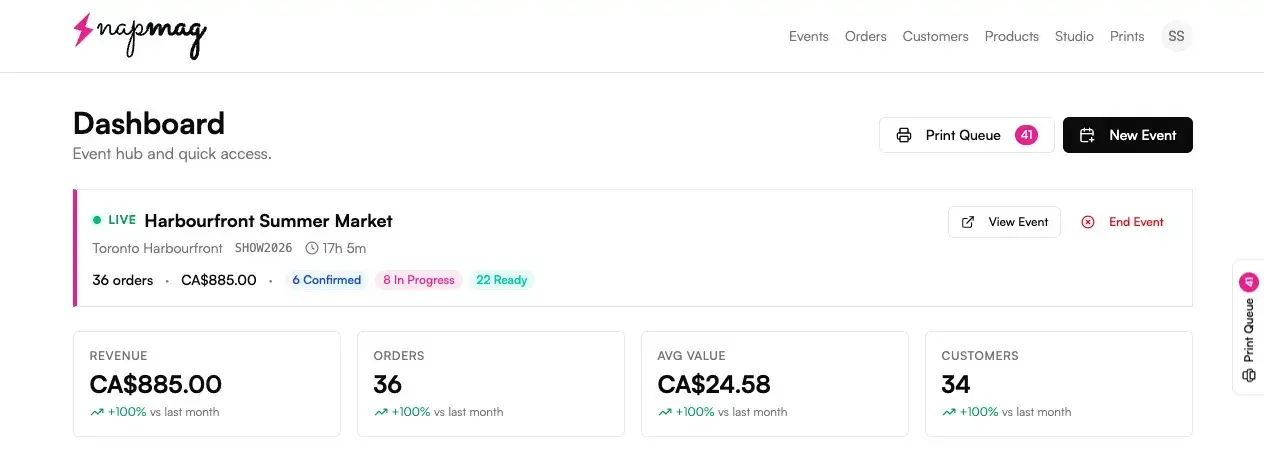
From your dashboard, open the event for today and hit Start event. The status flips to Active, the QR goes live, and a "Live for 0h 1m" badge starts ticking. The event page gives you three share actions: Download Sign (a printable 4×6 with the QR), Download QR code (PNG), and Print Sign. Pick whichever fits your booth setup.
A pulsing green Live indicator and a customer URL like vixie.app/e/X5K7Z9 appear at the top of the event page.
- 2
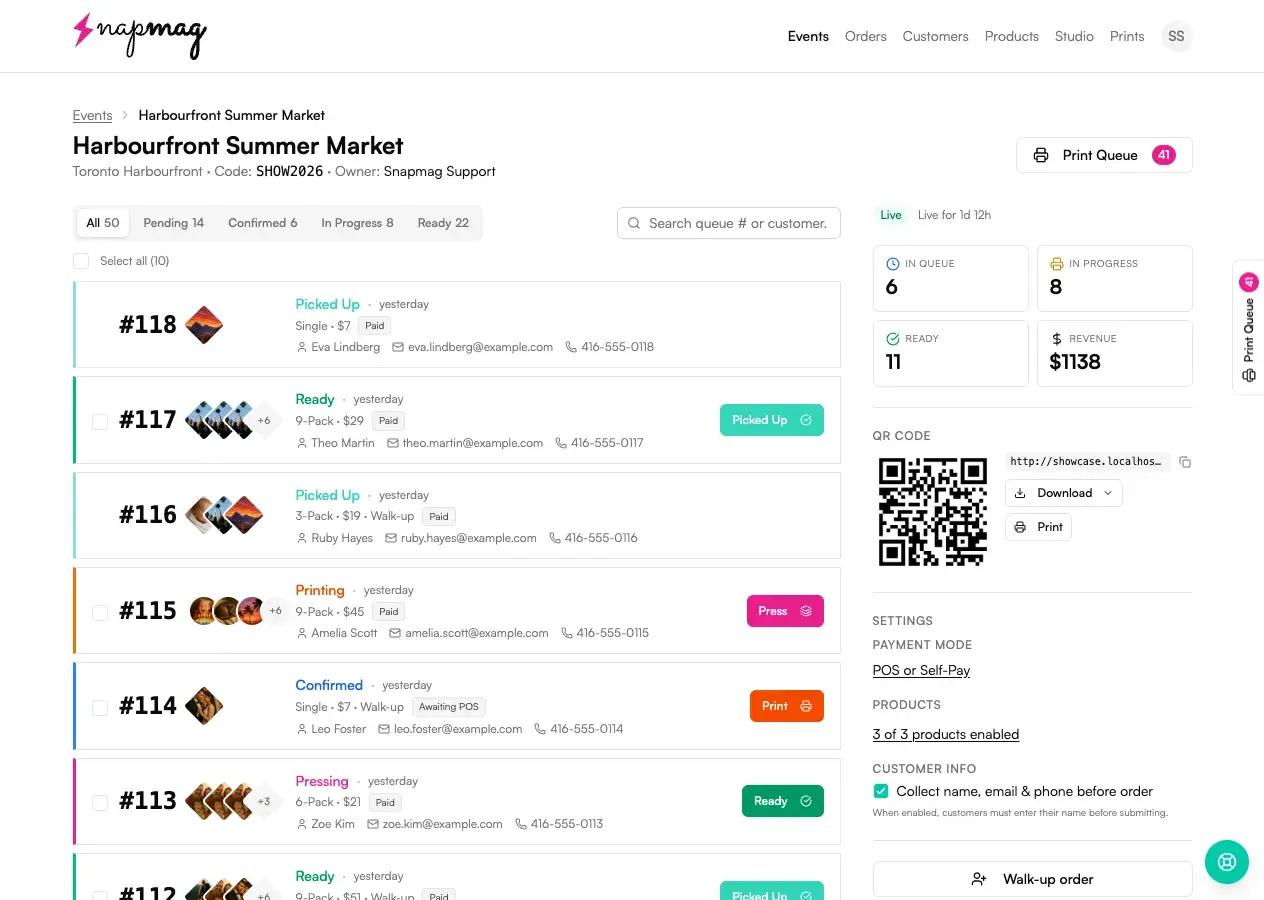
Step 2 — Watch orders land in the pipeline
Every paid order pops onto the feed at the top of the event page — customer photos, queue number (#001), pack size, price, and a Paid badge. Status tabs across the top — All · Confirmed · Printing · Pressing · Ready · Picked Up — let you filter at a glance. Each row has a colored left border that matches its status, so you can scan the queue without reading every label. Vixie plays a notification sound for every new order, so leave the tab open.
The order count and revenue total at the top tick up in real time.
- 3
Step 3 — Advance orders one tap at a time
Each row has an action button that moves the order to the next status: Confirm → Print → Press → Ready → Picked Up. On a phone or tablet, swipe the order card to the right to auto-advance. Orders move one at a time on purpose. Every tap matches a physical handoff at the booth, so the screen and the table stay in sync.
The row's left border colour and the tab counts update instantly across every device on the account.
- 4
Step 4 — Batch-print from the Print Queue
The Print Queue button at the top right shows the live magnet count (e.g. 41). Open it, pick paper size, set sheet count, and Vixie auto-packs the magnets across sheets with Sheet 1 / Sheet 2 dividers. Hit Print — Vixie generates a print-ready PDF, the magnets pop out of the queue, and the orders advance to Pressing automatically. If a sheet jams, open the Prints page and re-print the batch — same magnets, fresh sheet, no chasing.
The queue count drops, the orders flip to Pressing, and the printed sheet matches the on-screen layout.
- 5
Step 5 — Take walk-ups for customers without a phone
Some customers won't scan the QR — the kid wants to pick the photo, the grandparent doesn't want to pull out their phone. Hit Walk-up order in the event sidebar. Vixie opens the same product picker and photo upload flow you'd hand a customer. You collect their name and mark paid in the app. The order shows a Walk-up badge in the row and skips the Pending Payment step.
A new order appears in the feed with a Walk-up badge, already Confirmed.
- 6
Step 6 — Hand off without calling customers back
You don't chase customers around the venue. Every order has a live status page on the customer's phone — the same link they hit after checkout. When you tap Ready, their page flips to "Ready for pickup" automatically. They walk back when they see it. Once the magnets leave your hand, tap Picked Up. The order falls off the active tabs (still visible under All) and the booth queue stays clean.
The Ready tab empties faster than it fills — that's the booth keeping pace with the queue.
- 7
Step 7 — Close out the event
In the event sidebar, hit End event and confirm. Customers can no longer place new orders, but you can still advance any orders still in Pressing or Ready. Vixie generates a summary report — total revenue, order count, status breakdown, and a chart. You can pull it up any time from the event page.
The event flips to Closed, the QR stops accepting new orders, and your day-end totals are one click away.
The customer side
What customers see when they scan.
Most of your event-day work happens on the order feed, but it helps to know what customers are seeing — they'll ask. From scan to paid to "ready for pickup," the whole flow lives on their phone.
Crop, filter, and frame
Drag to position, pinch to zoom, rotate, flip, and pick a filter — all on their phone, all before they pay.
Pay on their phone
One tap on Pay by card opens Stripe — card, Apple Pay, or Google Pay. Money clears to your account on the processor's normal schedule.
Watch the live status
Queue number, plus Confirmed → Printing → Pressing → Ready ticking through automatically. They walk back when they see Ready.
Worth knowing: the status page on the customer's phone is the same link they hit after checkout. As long as they keep that tab open (or bookmark it), they'll see Ready the moment you tap it — no callback, no shouting names across the booth.
The order pipeline
Six statuses, in the order you'll touch them.
What each status means
- Pending Payment:
- customer is mid-checkout
- Confirmed:
- paid, waiting on you to print
- Printing:
- on the printer
- Pressing:
- at the press / cutter
- Ready:
- customer's status page goes green
- Picked Up:
- handed off, done
Tip: The status isn't just for the customer — it's how you and a partner stay in sync. If they see Pressing in the app, they know not to grab the same magnet off the printer.
Printing during the event
The Print Queue does the sheet math for you.
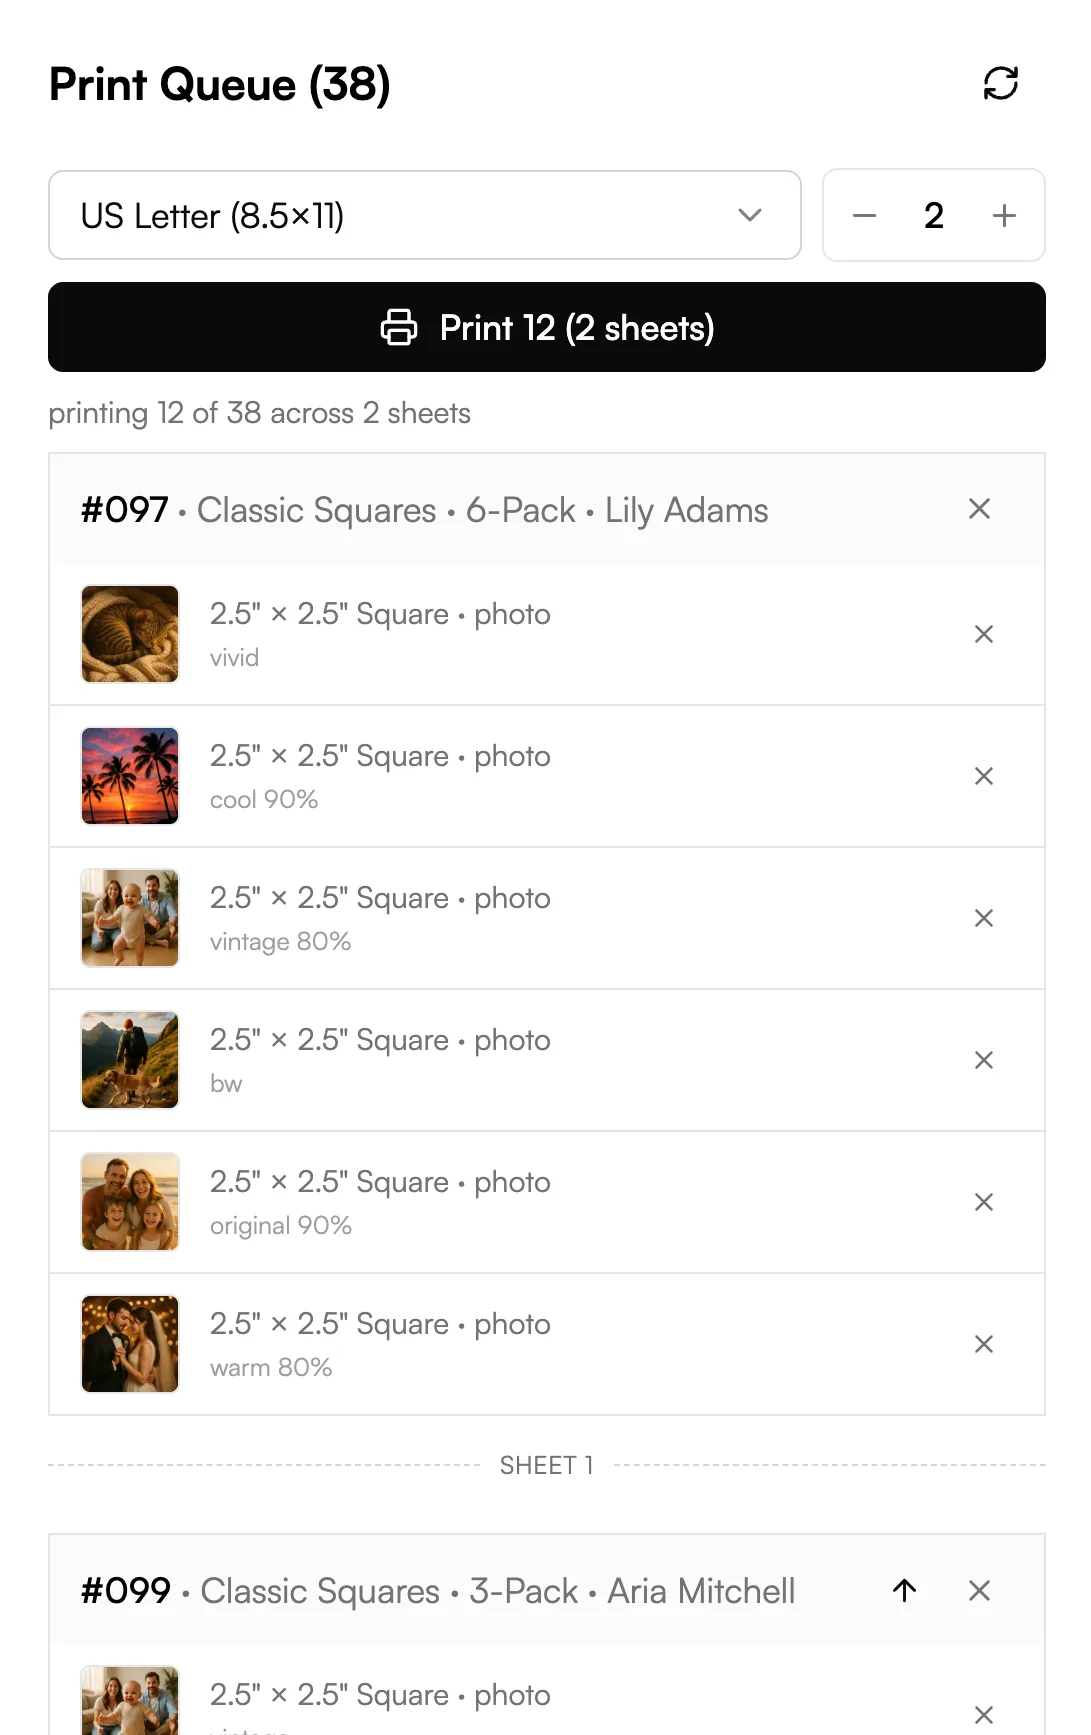
You don't print orders one at a time. The Print Queue button at the top right of the dashboard shows a live magnet count. Open it, hit Print, and Vixie generates a print-ready sheet from every paid magnet waiting.
- 1
Customers pay → magnets land in the queue
Every paid magnet shows up in the queue automatically. The badge in your top navigation ticks up so you always know how much is waiting.
- 2
Open the queue and pick scope + paper
Filter to the current event, or flip to Global queue to print across every active event. Pick paper size and sheet count (1–10 per job).
- 3
Hit Print
Vixie generates the PDF, the magnets pop out of the queue, and the orders advance to Pressing automatically. Send the PDF straight to your printer — the layout already matches your paper.
- 4
Re-print if a sheet jams
Open the Prints page, find the batch, and re-print. Vixie re-renders the same magnets onto a fresh sheet — no chasing the orders back through the queue.
If your prints look off-size or off-position: that's a measurements issue, not a queue issue. The magnet size measurements guide walks every field with annotated screenshots — most presses dial in within 2–3 test sheets.
When the QR isn't enough
Walk-ups for the customers who won't scan.
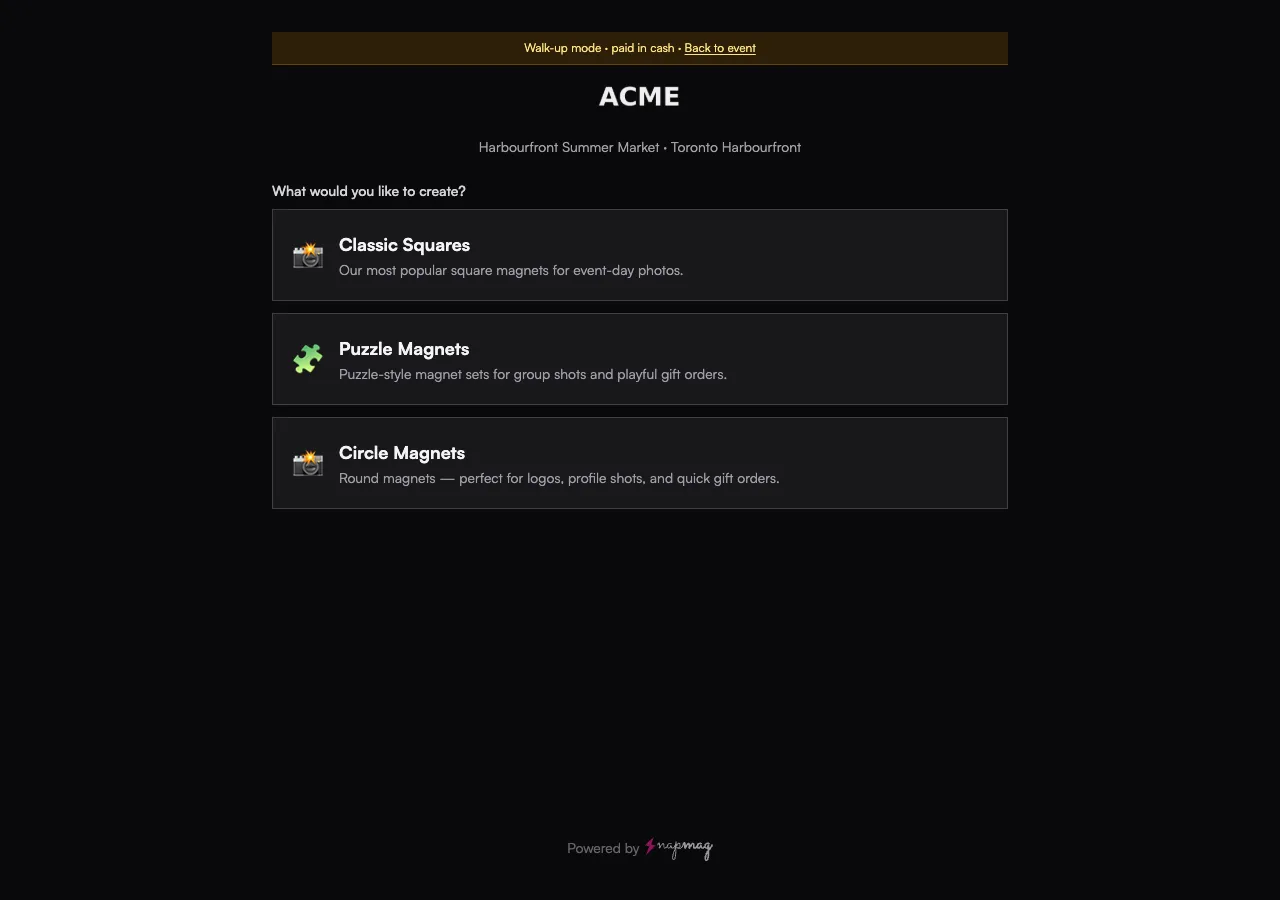
Some customers won't scan — the kid who wants to pick the photo themselves, the grandparent who doesn't want their phone out, the regular who just wants to hand you a USB stick. Hit Walk-up order in the event sidebar and Vixie opens the same product picker and upload flow on your device. Collect their name, mark paid, done.
Tip: Walk-up orders skip Pending Payment entirely and land as Confirmed. They show a Walk-up badge in the row so you can tell them apart from QR orders at a glance.
Tips from the field
Small habits that keep the booth flowing.
Print early, print often
Don't wait for the queue to stack to 60. Print every 10–15 magnets — it keeps the press warm and the wait time short.
Trust the live status page
Customers can keep their order page open and watch it flip from Confirmed to Printing to Ready. You don't need to shout names across the booth — the screen does the talking.
Phone hotspot is your insurance policy
Venue Wi-Fi will fail at least once a season. The booth keeps running on your phone's data — five minutes of cellular costs you nothing, an empty register costs you the day.
Mark Picked Up the moment they walk away
Lingering Ready rows make the next customer think the booth is behind. Tap Picked Up before you turn back to the press.
Questions
Live Event FAQ
A customer's phone won't load the QR page — what do I do?+
Can I refund someone mid-event?+
Can I change the payment mode after the event has started?+
A customer paid but the order still says "Awaiting POS." Why?+
How does a customer know their order is ready?+
Can my partner help from their own phone?+
I ended the event by accident. Can I reopen it?+
Can a customer who walked away come back and check their order?+
Keep going
Related reads.
Getting started with Vixie
Account, payments, products, branding, and your first event in about 30 minutes.
Read more →Size measurements · 10 minMagnet size measurements
Annotated walkthrough of every Edit Measurements field, plus a diagnostic table for the test sheet.
Read more →Free toolFree Print Studio
Drag-and-drop sheet layout for mixed-size and puzzle magnets — free in your browser.
Read more →Ready for your next market?
Sign in, hit Start event, and you're live. Or, if you're still setting things up, the 30-minute setup guide will get you there.
Sign in to your dashboardNew to Vixie? Start the setup guide →Or create a free account →